- Share
-

-

-

-


In the latest update of our game matchmaking service, we implement the Dedicated Server Manager functionality. In this guide, we will walk you through how to test the Matchmaking with Dedicated Server set locally. The concept details can be seen from the image and its explanations below:
Concept
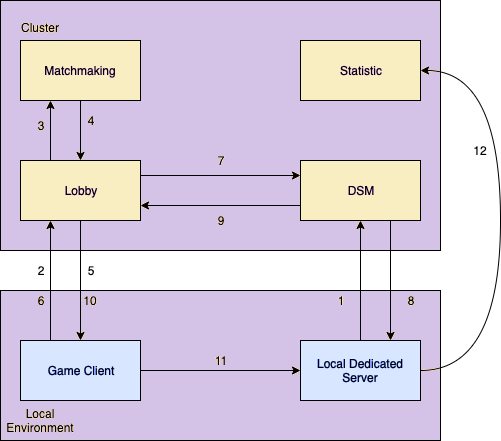
- Local Dedicated Server (DS) registers itself to DSM (Dedicated Server Manager)
- Game Client requests for matchmaking through Lobby
- Lobby forwards the matchmaking request to Matchmaking Service
- When match is found, Matchmaking Service notifies the Lobby Service
- Lobby notifies Game Client that a match is found
- Game Client sends the ready consent
- After all players in the match sent the ready consent, Lobby asks DSM for a DS and passes the match details
- DSM passes the match details to DS via websocket
- DSM sends back the local DS details to Lobby
- Lobby forwards the DS details to game client
- Game client connects to DS and the game starts
- After the game ends, DS sends the updated player attributes (MMR, points, etc) to the statistic service
Prerequisites
- Dedicated Server build
a. DS must be capable of making HTTP requests to our backend
b. DS must have an IP address and port accessible from the game client
c. DS’s IP and port should be noted, since it will be sent to our backend - Game client build
a. Game client must be capable of making HTTP requests to our backend
b. Game client must be able to connect to DS’s IP and port - Platform’s Admin Account
a. The account must have the permission to manage statistic config
b. The account must the permission to manage matchmaking config
c. The account must have the permission to manage DSM
Before you read the guides below, please note that the project in https://dev. project.accelbyte.io is just an example domain name for a project we're working on.
Setup Statistic
Create Statistic Configuration
To implement matchmaking, you need to define the stat attributes to be consumed by the matchmaking service to match players. These attributes are tied to the player and is used by the Matchmaking Service every time a player requests for a match. Please follow the guides below to configure the statistic attributes.
- Go to the statistic swagger (https://dev.project.accelbyte.io/statistic/apidocs)
- Make sure you already have the Bearer 'access_token' for authorization (using login.exe)
- Use the 'create stat' configuration endpoint here https://dev.project.accelbyte.io/statistic/apidocs#!/StatConfiguration/createStatUsingPOST
- Use your namespace that has previously been created
- Use the following request body example:
{
  "defaultValue": 0,
  "description": "point used for matchmaking",
  "incrementOnly": true,
  "maximum": 99999,
  "minimum": 0,
  "name": "matchmaking point",
  "setAsGlobal": true,
  "setBy": "SERVER",
  "statCode": "match-point",
  "tags": [
    "match"
  ]
}
Parameters description:
- statCode - The unique readable identifier to be used for API call or Function call from the code. Allowed format: alphanumeric, lowercase, hyphens
- name - The name of the stat attribute.
- description - Description of the stat attribute.
- defaultValue - The initial value assigned as default.
- minimum - The minimum value allowed to assign.
- maximum - The maximum value allowed to assign.
- setAsGlobal - Type: boolean. If it's set as true, everytime the stat is updated, it will also update the global stat value.
- incrementOnly - Type: boolean. If it's set as true, the stat value can only increase and not decrease.
- setBy - Can be set to game client or game server, it depends on which client to call the Update Stat Value API.
- tags - Can be used to group stats according to a specific context.
Create User Statistics
After configuring the stat attributes, you need to tie the stats to the user by using create user’s stat function. This call can be set using server SDK and is triggered when the user successfully connects to the dedicated server. Creating the player stats will also assign the default value of user's stat configuration.
#include "GameServerApi/AccelByteServerStatisticApi.h"
FAccelByteModelsBulkStatItemCreate TestStat;
TestStat.StatCode = "NUMBER_OF_KILLED";
FString UserID = "Game Client UserID";
FRegistry::ServerStatistic.BulkCreateUserStatItems(UserID, { TestStat },
        THandler<TArray<FAccelByteModelsBulkStatItemOperationResult>>::CreateLambda([](const FAccelByteModelsBulkStatItemOperationResult& Result) {
                // Bulk Create user Multiple Stat code Success
            }),
        FErrorHandler::CreateLambda([](int32 Code, FString Message)
            {
                // Bulk Create user Multiple Stat code failed
            }));
Setup Matchmaking
These matchmaking configurations are intended to match players without party.
To do so, we call the matchmaking configuration with a channel. You can configure the matchmaking channel using our matchmaking swagger directly: https://dev.project.accelbyte.io/matchmaking/apidocs/
- Go to the matchmaking swagger
https://dev.project.accelbyte.io/matchmaking/apidocs/ - Make sure you already have the Bearer ‘access_token’ for the authorization (using login.exe)
- Use 'create channel' endpoint here
https://dev.project.accelbyte.io/matchmaking/apidocs/#!/Matchmaking/CreateChannelHandler - Use your namespace that has previously been created
- Use the following request body example:
1v1 Config
This is a channel configuration for a 1 vs 1 match - 2 players are matched together in this configuration.
{
    "description": "1v1 duel match",
    "game_mode": "duel",
    "rule_set": {
        "alliance": {
            "min_number": 2,
            "max_number": 2,
            "player_min_number": 1,
            "player_max_number": 1
        },
        "flexing_rule": [{
            "attribute": "match-point",
            "criteria": "distance",
            "reference": 100,
            "duration": 120
        }],
        "matching_rule": [{
            "attribute": "match-point",
            "criteria": "distance",
            "reference": 50
        }]
    }
}
3v3v3 Config
This is a channel configuration for a 3 vs 3 vs 3 match. 9 individual players are matched together in this configuration.
{
    "description": "3v3v3 battle royale",
    "game_mode": "battle royale",
    "rule_set": {
        "alliance": {
            "min_number": 2,
            "max_number": 3,
            "player_min_number": 3,
            "player_max_number": 3
        },
        "flexing_rule": [{
            "attribute": "match-point",
            "criteria": "distance",
            "reference": 100,
            "duration": 120
        }],
        "matching_rule": [{
            "attribute": "match-point",
            "criteria": "distance",
            "reference": 50
        }]
    }
}
Parameters description:
- description - The description of the game mode.
- game_mode - The name for the game mode.
- find_match_timeout_seconds - The duration for how long a matchmaking request can stay in queue before being timed out, set to 0 to let the request stay forever.
- rule_set - The rule set for the game mode
- alliance - The attributes for the alliance to define how many sides or teams to be matched
- min_number - The minimum number of alliances required for the match
- max_number - The maximum number of alliances allowed for the match
- player_min_number - The minimum number of players required in an alliance to start the match
- player_max_number - The maximum number of players in an alliance - matching_rule - The rules that are used to find the match
- attribute - Fill the attribute with the statCodes from the statistics configuration
- criteria - The default value is distance. Matchmaking will match players based on their distance attribute
- reference - The reference number for the criteria - flexing_rule - The rules that is used when the matchmaking service cannot find an available match based on the matching_rule. You need to define the same flexing_rule attributes as the matching_rule with higher reference points.
- duration - Duration for the flexing rule to take effect when there's no match found using the specified matching_rule.
Local Dedicated Server
- With a known IP address and port, run the DS.
- Register DS to DSM using this server SDK call:
// Please put reachable IP address from game client.
FString IPAddress = "127.0.0.1";
int32 PortNumber = 7777;
FString ServerName = "your-awesome-game-server";
AccelByte::FRegistry::ServerDSM.RegisterLocalServerToDSM(
   IPAddress,
   PortNumber,
   ServerName,
   THandler<FAccelByteModelsDSMMessage>::CreateLambda([](const FAccelByteModelsDSMMessage& Result){
    // Register Local Server to DSM Success
    // This should be called when matchmaking found player to play

    UE_LOG(LogTemp, Log, TEXT("Game Mode: %s. Namespace: %s. Pod Name: %s. Session ID: %s"),
        *Result.Message.Game_mode,
        *Result.Message.Namespace,
        *Result.Message.Pod_name,
        *Result.Message.Session_id);
}),
        FErrorHandler::CreateLambda([OnError](int32 Code, FString Message)
    {
        // Register Local Server to DSM Failed!
    }));
3. When registering, the DS is connected to the DSM using WebSockets. We wait for a message containing the info about the match and the players about to connect. It is shown as the Lambda function above.
4. After the match is done, DS uses this server SDK call to update the player’s attributes in the statistic service:
#include "GameServerApi/AccelByteServerStatisticApi.h"

// for example we are going to update 1 user
FAccelByteModelsBulkStatItemInc MVP;
MVP.inc = 1;
MVP.statCode = StatisticStatCode;

FRegistry::ServerStatistic.BulkAddUserStatItemValue({ MVP }, THandler<TArray<FAccelByteModelsBulkStatItemOperationResult>>::CreateLambda([](TArray<FAccelByteModelsBulkStatItemOperationResult> Result){
        // Bulk Add user STATITEMS SUCCESS!
    }), FErrorHandler::CreateLambda([](int32 Code, FString Message)
    {
        // Bulk Add user STATITEMS Failed
    })
);
5. To make sure that the DS is not registered in the DSM anymore, call this server SDK function to deregister the DS from DSM:
FString ServerName = "your-awesome-game-server";

AccelByte::FRegistry::ServerDSM.DeregisterLocalServerFromDSM(
   ServerName,
   FVoidHandler::CreateLambda([](){
      // Deregister success
   }),
   FErrorHandler::CreateLambda([OnError](int32 Code, FString Message)
   {
    // Deregister failed
   })
);
Game Client
- Make sure the player is logged in.
- Call this 'game SDK function' to ask the Lobby Service to start the matchmaking. Note that we are passing the DS unique name to make sure that this player will connect to the local DS.
// Make sure you use same server name from Local Dedicated Server Above
FString GameMode = TEXT("1v1");
FString ServerName = TEXT("your-awesome-game-server");
AccelByte::FRegistry::Lobby.SendStartMatchmaking(GameMode, ServerName );
3. Wait for the Lobby to send a notification that a match is found.
AccelByte::FRegistry::Lobby.SetMatchmakingNotifDelegate(AccelByte::Api::Lobby::FMatchmakingNotif::CreateLambda([&](const FAccelByteModelsMatchmakingNotice & Response)
    {
        if (Response.Status == EAccelByteMatchmakingStatus::Done)
        {
            // Match found
            FString MatchId = Response.MatchId;

            // send ready consent
AccelByte::FRegistry::Lobby.SendReadyConsentRequest(MatchId);
        }
        // show loading for non leader party member
        else if (Response.Status == EAccelByteMatchmakingStatus::Start)
        {
            // matchmaking has started
        }
        else
        {
            if (Response.Status == EAccelByteMatchmakingStatus::Cancel)
            {
                //Matchmaking canceled by party leader
            }
            else if (Response.Status == EAccelByteMatchmakingStatus::Timeout)
            {
                //Matchmaking failed: Timeout
            }
            else if (Response.Status == EAccelByteMatchmakingStatus::Unavailable)
            {
                // dedicated server unavailable
            }
            else
            {
                // matchmaking failed
            }
        }
    }));
4. Send the ready consent to notify that the player is ready to join the match using this SDK call:
AccelByte::FRegistry::Lobby.SendReadyConsentRequest(MatchId);
5. Wait for the DS details from Lobby
AccelByte::FRegistry::Lobby.SetDsNotifDelegate(AccelByte::Api::Lobby::FDsNotif::CreateLambda([&](const FAccelByteModelsDsNotice& Notice)
    {
        UE_LOG(LogOnlineGame, Log, TEXT("DS Notif Status: %s"), *Notice.Status);

        if (Notice.Status.Compare(TEXT("READY")) == 0)
        {
            FString ServerAddress = FString::Printf(TEXT("%s:%i"), *Notice.Ip, Notice.Port);

           // Use this IP address and port to connect to your server.
        }
    }));
6. Connect to the DS using the details.
Cleaning Up
To make sure that the local DS is already deregistered from the DSM, use the DSM swagger at https://dev.project.accelbyte.io/dsm/apidocs/
- Fill in the auth header text field in the top right corner with
Bearer <access_token>
2. Call this endpoint to see if the local DS is still registered
GET /dsm/admin/namespaces/{namespace}/servers/local
3. Call this endpoint to remove the local DS manually
DELETE /dsm/admin/namespaces/{namespace}/servers/local/{name}
If you have any question regarding this product update and guides, please contact support@accelbyte.io. Visit our blog pages for more updates and guides/tutorials.


Find a Backend Solution for Your Game!
Reach out to the AccelByte team to learn more.