



As a web engineer I usually spend my time working on the AccelByte Gaming Services (AGS) Admin Portal or the website, but recently I had the opportunity to make my own game. I've always loved the old retro style shooters like R-Type and Radiant Silvergun so I decided to try and make something simple along those lines. Naturally I wanted to make the most of all the cool features that AGS has to offer to make it a fun online capable experience. The game itself is a fairly simple web-based game and works as a series of enemy waves that the player has to shoot down.
See the video below to get an idea of how the game works.
{% video_player "embed_player" overrideable=False, type='hsvideo2', hide_playlist=True, viral_sharing=False, embed_button=False, autoplay=True, hidden_controls=False, loop=False, muted=False, full_width=False, width='1920', height='1032', player_id='399430654652', style='' %}
Once I'd got the basic functionality working I wanted to do something a little bit different:
When players finish a run, I wanted to award them coins based on their final score.
Coins in the game are a virtual currency that can be used by a player to buy a ship skin or equipment. Awarding a virtual currency in AGS is straightforward enough but allowing the client to control this directly would enable cheating or failed retries to result in multiple awards for a single run. So this meant that the awarding mechanism needed to be controlled by the backend. The rest of the article explains how I achieved this using two new features that are part of AGS Extend.
Before discussing the solution I ended up with, I explored whether AGS already had functionality that could do what I wanted. AGS ships a Reward service that grants items or entitlements by rule, entirely server-side, with no Extend app required at all. It even documents a Statistic event topic, with statItemCreated/statItemUpdated triggers, built for exactly this shape of rule: fire when a player's score is written as a statistic (the same kind of statistic a leaderboard is built from), filtered on the stat's code and value. On paper, this looked like it could replace everything I ended up building, configured entirely in Admin Portal with no topic-name guessing required. It couldn't, every reward that path can grant is an item or entitlement pulled from a store, quantity and all. Coins in this game are wallet currency, not a store item, and I couldn't find a reward type that credits a wallet balance directly. So for this one I stuck with the Extend service, and kept the Reward service in mind for the day the reward is an item instead of currency.
That left me with AGS Extend. If you're not familiar with AGS Extend, it lets you attach your own backend code to AGS. This can be as simple as overriding some existing functionality in AGS, or listening to events that AGS triggers, all the way up to creating your own new service.
If you're adding a service, it can do pretty much anything you want including having its own credentials. This allows Extend based services to be a first class citizen of AGS and perform trusted operations that you would not want to do directly from a player's own browser session. As we briefly mentioned above the client can lie about the final score or even perform the reward multiple times so I needed this logic to live on the backend. To do this I added a new service called wallet-credit-extension that makes use of two recently added Extend features: Extend App UI and Extend Key Value Store.
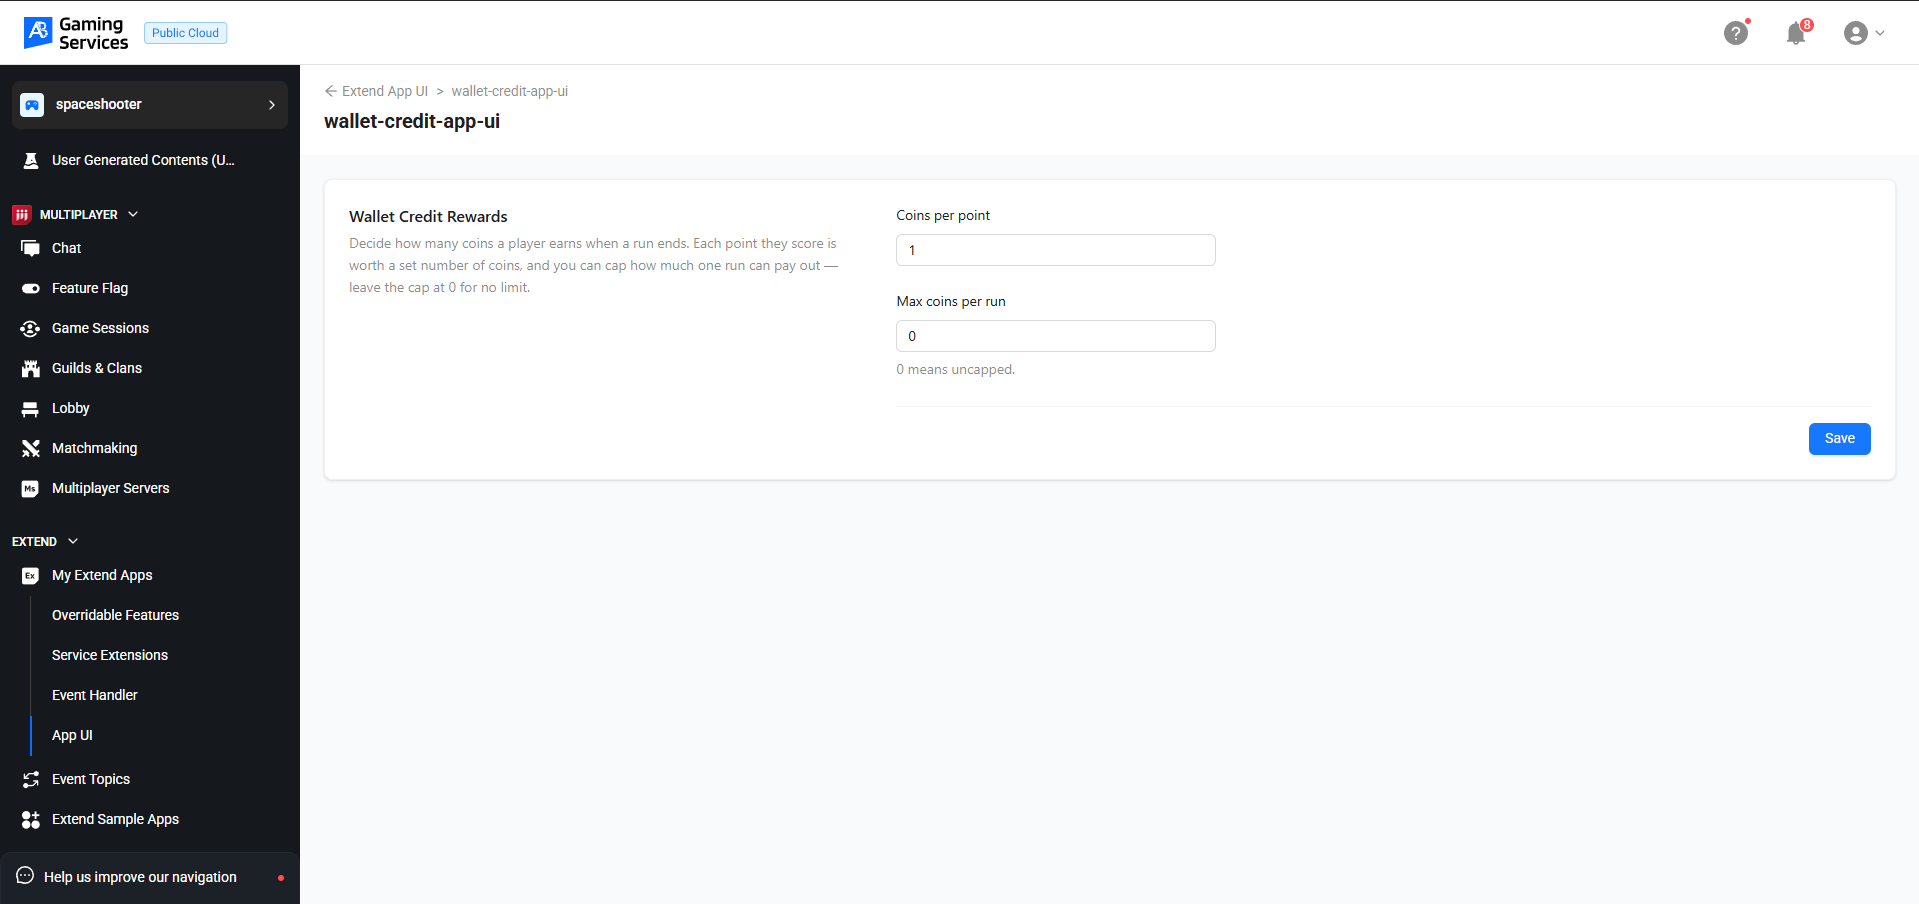
To see how this works in practice, consider the player experience inside the shooter. After navigating several waves, the player reaches the game over screen. The HUD immediately updates with their final score, while a brief pause occurs as the client issues a request to wallet-credit-extension. Once completed, an updated coin total renders below. This total pulls directly from the player's underlying account wallet, which the main menu relies on for transactions. That short delay represents the service executing its core duty: calculating the payout safely on the server side and updating the wallet record. Controlling that calculation is where these two tools come in. The Key Value Store guarantees each session awards currency only once, while the App UI gives live-ops teams a simple dashboard to adjust exchange rates instantly during live events without needing a redeployment.
Why I Needed Either of Them
The wallet-credit-extension service is the Extend service I built to handle player rewards. I got it set up to handle the basic flow correctly: a player finishes a run, the browser calls it with a valid access token, and it decides how many coins to add to the player's wallet. Two problems were left once that much was working.
First, a retried request could credit a player twice. Nothing in AGS's own wallet API, and nothing in my own request, gave the server a way to tell "this is the same run again" from "this is a new run." A timeout followed by a browser retry, or two tabs open at once, could end in a real double payment.
Second, the payout rate was a number written straight into the Go code: one coin per point, no cap. Changing it meant a code change, a build, and a redeploy, for a single number a live-ops person should be able to change in seconds.
I picked a Key Value Store to solve the first problem and an App UI screen to solve the second, having already ruled out the built-in Reward service for the reasons above. The tradeoff was real: the Extend path cost more build time than the Reward service would have, in exchange for a rule I could see and test end to end.
I also decided, early, against a third App UI screen for wallet transaction history. Admin Portal already shows that, under Commerce, so a screen that only repeated it would have added nothing. Both App UI and the Key Value Store earn their place only when they do something Admin Portal cannot already do on its own.
Live Ops Tool for Rewards with Extend App UI
What It Is
An Extend App UI project is a small React app that Admin Portal downloads and runs inside its own page, not a separate site you host and link to. Admin Portal is the host, your code is the guest. Your project exports one function, mount(container, hostContext), and Admin Portal calls it once it has fetched your built bundle. hostContext carries the studio's SDK settings, the current base path, and a function that tells you whether the signed-in admin actually holds a given permission. Everything after that point is an ordinary React app, its styles scoped so they don't leak into the rest of the page.
Scaffolding the Project
ags extend clone-template lists every starter template the CLI knows about, three of which are App UI templates:
Extend App UI :: react :: JavaScript
Extend App UI :: react-minimal :: JavaScript
Extend App UI :: react-multiple-extend-apps :: JavaScript
react-minimal is a blank page. react-multiple-extend-apps is built for a screen that talks to more than one Extend service. I picked plain react, since this screen only ever needs to call the one service behind it:
ags extend clone-template --template "Extend App UI :: react :: JavaScript" \
--destination apps/wallet-credit-app-ui
This is a full working reference app already wired end to end against a different Extend service (a tournament manager), not a blank page, so it saves real boilerplate. It also leaves a few things pointed at that other service, which need fixing by hand before your own code will build cleanly: swaggers.json still names the old app's Swagger file, and the ESLint config still globs the old app's source folder. Both are a few minutes' work, and neither is caught for you.
With the local project in place, register it as a real App UI in your namespace:
ags extend app-ui create --namespace <namespace> \
--json '{"name": "wallet-credit-app-ui"}'
This call changes state in your live AGS namespace, not just on your own disk, the same as creating any other cloud resource, so run it once with --dry-run before running it for real.
Running It Locally
ags extend app-ui setup-env --name wallet-credit-app-ui \
--project-path apps/wallet-credit-app-ui
This reads the App UI record you just created back from AGS and writes a .env.local with the four VITE_AB_* variables the SDK needs: client ID, namespace, base URL, and environment. One thing it does not set is this app's own addition, VITE_AB_EXTEND_APP_NAME, the name of the Extend service the screen actually calls, since that's specific to this project and not part of the App UI record itself. Re-running setup-env later (say, after rotating a client) resets that field to blank again, so it has to go back in by hand each time. module.tsx throws a clear error at startup if either that value or the namespace is missing, rather than silently building a URL with the literal string undefined baked into it, which is what an empty template variable turns into at build time with no warning otherwise.
cd apps/wallet-credit-app-ui
npm install
npm run codegen # pulls the deployed service's live Swagger spec
npm run dev
codegen only works once the backend is deployed with the RPCs you want to call; regenerate it again any time the .proto changes and the service redeploys. npm run dev serves the screen on its own at localhost:5173, outside Admin Portal's actual frame. In that mode the SDK's own dev provider stands in for Admin Portal: it handles sign-in and runs the same kind of permission check the real host performs, so the screen behaves close to how it will once it's actually embedded.
Deploying It
ags extend app-ui upload --name wallet-credit-app-ui \
--project-path apps/wallet-credit-app-ui
This runs the project's own build, zips the output directory, and uploads the archive. AGS hosts the resulting static files itself, so there's no separate hosting step and no separate URL to manage. Pass --no-build to skip the build and re-upload an existing dist/ as is, and --build-version to stamp a specific version identifier instead of the random one the CLI generates by default.
Verifying It Works
Open Admin Portal, navigate to the app's screen, and confirm the form loads with the default values (one coin per point, no cap). Change a value, save, then reload the page from scratch and confirm the new value is still there. That reload matters: it's the difference between proving the save actually reached the Key Value Store behind the service and just trusting whatever the form happens to show right after a click.
Check two more things before calling this done. First, send one real request from the actual signed-in browser screen, not just from a script with a hand-set header. This service sits behind gRPC-gateway, which by default forwards a browser's Authorization and Cookie headers under different key names than a typical interceptor expects to read, so a token that looks valid can still fail to authenticate purely because of how the header arrived. Second, break something on purpose, save a negative cap, for instance, and confirm the screen shows the backend's actual rejection message rather than a generic failure. This service returns its own errors wrapped as { message }, not the { errorMessage } envelope AGS's own platform-level rejections use, so an error handler that only checks one shape will show nothing useful for other.

Idempotency Payouts with Extend Key Value Store
What It Is
The Key Value Store is a managed Redis-protocol cluster (AWS ElastiCache running Valkey, in serverless mode) that you provision once per namespace and attach to any Extend service that needs it. One cluster holds one keyspace, shared by every app attached to it. Once attached, its host, port, username, and password reach your service as plain environment variables.
Provisioning the Cluster
Check what's already there before creating anything new:
ags csm key-value list-clusters --namespace <namespace>
If nothing fits, create one:
ags csm key-value create-cluster --namespace <namespace> --json '{
"clusterName": "wallet",
"maxDataStorageGB": 10,
"maxECPUPerSecond": <ecpu-limit>,
"profileName": "Development"
}'
Attach the cluster to your app in one call. This is also the step that actually pushes credentials into the app's own configuration, so nothing needs copying by hand afterward:
ags csm key-value create-integration --app wallet-credit-extension \
--namespace <namespace> --json '{
"resourceId": "<cluster-resource-id>",
"username": "<username>",
"password": "<password>",
"acknowledgements": { "acceptKeyValueSecureCredentialHandling": true }
}'
The password isn't generated for you, you choose it, and the CLI enforces a plain complexity rule on it: at least one uppercase letter, one lowercase letter, one digit, and one special character. A random base64 string doesn't guarantee all four, so build one on purpose rather than piping openssl rand straight in and assuming it will pass.
Confirm the four values actually landed before moving on:
ags csm config list-variables --app wallet-credit-extension --namespace <namespace>
ags csm config list-secrets --app wallet-credit-extension --namespace <namespace>
REDIS_HOST, REDIS_PORT, and REDIS_USERNAME show up as plain variables; REDIS_PASSWORD shows up masked, as a secret. If a change to the app's configuration hasn't been picked up yet, list-variables also reports a deploymentStatus of undeployed for it, a direct way to tell "this needs a redeploy" from "this hasn't saved."
Running It Locally
ags extend tunnel --resource-name <cluster-resource-id> \
--namespace <namespace> --local-port <port>
This binds a local TCP port and bridges it to the cluster over the same CSM tunnel infrastructure the CLI's remote-debug commands use, and it runs until you stop it with Ctrl-C. Point the service's local .env at REDIS_HOST=localhost, REDIS_PORT=<port>, and the same username and password from the integration step. A plain redis-cli, pointed at the same tunnel with a rediss:// URL, is a fast way to check exactly what a local run wrote, with no extra code:
redis-cli -u "rediss://<username>:<password>@localhost:<port>"
With the tunnel open, run the Go service locally and call GetRewardConfig against it. With nothing written yet, it should return the seeded default, one coin per point, uncapped, proving the fallback path works before any real data exists.
Deploying It
The Go client never opens a connection until the first real command runs against it, so a bad host or a bad credential would otherwise look perfectly healthy right up until the first call that needs it. The service adds its own short-timeout ping at startup and exits if the store can't be reached, the same way it already exits if a required variable like the currency code is missing. Once the local test above looks right, rebuild and redeploy the service:
docker build --network=host --platform linux/amd64 \
-t <repo-from-ags-csm-apps-get>:<tag> .
ags extend docker-login --app wallet-credit-extension --namespace <namespace>
docker push <repo-from-ags-csm-apps-get>:<tag>
ags csm deployments create --app wallet-credit-extension \
--namespace <namespace> --json '{"imageTag":"<tag>"}'
Default to --network=host on Docker Desktop or WSL2 setups: the default bridge network can fail to reach the internet mid-build on some host VPN or security software, which shows up as a failure inside apt-get or go mod download, not as a network error up front. Then watch the rollout instead of guessing from a stuck state:
ags csm apps get-status-progress --app wallet-credit-extension --namespace <namespace>
This prints the actual step-by-step progress of the deployment, which is the fastest way to catch a missing or wrong environment variable: it shows up here as a deployment that never finishes starting, rather than as an error message pointing at the real cause.
Verifying It Works
Once the service is back up with the Key Value Store attached, prove both of its jobs end to end, not just that it deployed cleanly. Through the App UI, set coins-per-point to two, then play one run to game over in the browser game and confirm the credited balance reflects points times two, not the raw point total, the concrete proof that the server, not the client, now controls the payout. Then take that exact same request (same run_id, same body) and send it again, by hand, with a tool like curl. The second call should return the identical balance, and AGS's own Wallet History screen (Commerce → Wallets → User Wallets) should still show only one credit transaction for that run. That's idempotency proven with real traffic, not just with a unit test.
Finding the Idempotency Race with a Goroutine Test
The first version of the idempotency check used a plain Get: look up the run ID, and if nothing is there, credit the wallet and Set the result. That isn't atomic. Two truly concurrent requests for the same run ID (a client retry racing the original, say) can both see a miss, and both go on to credit the wallet, before either one finishes writing its result back.
I didn't find this by reading about it. I found it by writing a test that forced two goroutines to race on purpose, using a wait group as a rendezvous point so both requests would reach the check at the same instant instead of leaving it to luck. The first version of that test used a single rendezvous point and came out flaky, since one goroutine could sometimes finish the whole miss, credit, and store sequence before the other even woke back up. A second rendezvous point, forcing both goroutines to actually finish their read before either could move on, made the race happen every time.
The fix replaced the plain Get with SetNX: set a value only if the key doesn't already hold one, and report which case happened. Now a request reserves the run ID with a short-lived marker before crediting anything. A second request racing the same run ID either sees that marker, meaning the first request is still in flight, and is told to retry shortly, or sees a finished result, meaning the first request already succeeded, and replays that result unchanged. Either way, exactly one of them ever calls the code that actually credits the wallet. Get and Set alone can never guarantee that, no matter how carefully you order them, because two callers can always slip past a Get at the same instant. SetNX is the one operation that makes the check and the reservation a single, atomic step.
Why Each One Is Worth Using, and Where It Isn't
Extend App UI is worth reaching for when a Studio Admin needs to see or change something your own custom service knows about, and Admin Portal has no screen for it already. It is not worth reaching for when Admin Portal already shows the same thing; check first, since duplicating an existing screen adds a second place for the same data to drift out of sync. Plan for its build-time coupling too: the namespace and the Extend app it targets are baked into the bundle at build time, not read at runtime, so pointing an already-built screen at a different service or namespace means a rebuild, not a config change.
The Key Value Store is worth reaching for when what you need is a single value behind a single key, with an optional expiry: an idempotency marker, a small tunable config value, a feature flag. It is not the right tool the moment you want to list, filter, or search across many keys at once, or the moment you need a real audit trail of who changed what and when; that is a job for a real database, not a key-value cache. Its keyspace is shared with no isolation of its own, so prefixing every key you write is not optional housekeeping. It is the only thing standing between your app's data and another app's.
Both features shipped in the same AGS release. The Key Value Store is still marked alpha as of this writing; the capability is real, and the build steps above work as written, but treat version-to-version behavior as still settling, and read the release notes before you rely on it in a live game.
Related Reading
Build Faster with AGS CLI & AI Plugin
Featured Blog Posts

Featured Customer Stories



Bring your first player online today.
Get started for free, and scale as your game grows.