BuildInfo is a system that can be used to manage different build versions of a game. The term build in BuildInfo refers to a collection of a game's files (or binary chunks of file for legacy code) that is used to download a game according to its current version. Every detail of the build version is stored in the form of a build manifest.
There are two main components of the BuildInfo system:
BuildInfo Service: This is the main part of the BuildInfo system, which handles all functionalities related to the build process. All communication between BuildInfo and third-party services is managed by this service.
BuildUtil (BuildInfo CLI): This component is a command-line tool that consumes the BuildInfo service. This program can be run manually or put in a CI/CD tool to automate the release of new game versions.
The BuildInfo system comes with several high-level features, such as:
BuildInfo provides binary and upload management for game and DLC binaries.
Buildinfo provides release note management.
BuildUtil (BuildInfo CLI) provides zsync control file generation for efficient downloads.
Buildinfo supports DynamoDB and MongoDB databases.
About BuildUtil (BuildInfo CLI)
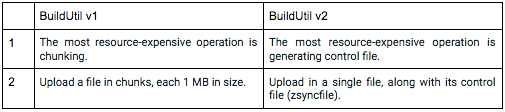
BuildUtil is used to upload game binaries to the cloud for further distribution. BuildUtil provides meta information that's recorded by BuildInfo during an uploading session. Currently, there are two versions of BuildUtil that differ in their treatment of files:
About BuildInfo Service
BuildInfo Service is the part of the system that's responsible for managing all functionalities related to the build process. It was developed using Java and Spring as its framework. BuildInfo Service supports the use of MongoDB and DynamoDB databases to store file manifests (binary files). As for object storage, BuildInfo uses Amazon Web Service (AWS) S3.
How to use the Upload Feature in BuildUtil Service
Before using BuildUtil Service to upload a build manifest, make sure you have the following requirements:
BuildUtil Client Credential.
Game Client Credential.
IAM URL.
Once you have collected the required items, you can start uploading your game using BuildUtil. There are two ways to upload a game using BuildUtil:
Option 1: Upload a Game Using BuildUtil
First, download our latest BuildUtil.exe and save the file in your directory.
Then, open your terminal or command line to run BuildUtil.
Input the required data: - IAM URL - Uploader’s Client ID (BuildUtil client ID) - Uploader’s Client Secret (generated when you create the Build Util Client and Client Secret) - Log level (optional)
After you press Enter, you will go back to your base. Now you can start to upload a game using Build Util.
Here new line will appear: Using config file. Here, you need to input the directory to the config file from the BuildUtil configuration in the previous steps.
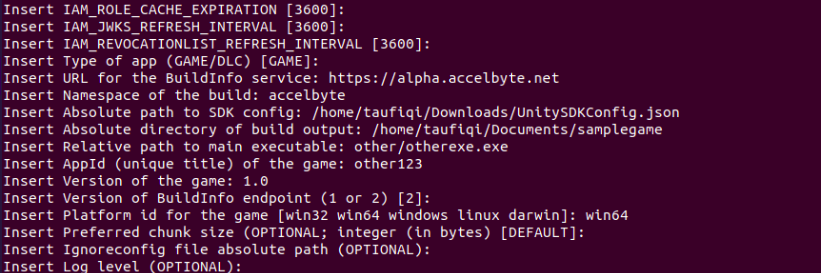
Here are the list of config files you input the directory to: - IAM_ROLE_CACHE_EXPIRATION [3600] (optional) - IAM_JWKS_REFRESH_INTERVAL [3600] (optional) - IAM_REVOCATIONLIST_REFRESH_INTERVAL [3600] (optional) - Type of app (GAME/DLC) [GAME] The two types of supported file are GAME and DLC. The default value is GAME; for DLC type DLC in the provided field. To use GAME, you can leave the field blank. - URL for the BuildInfo service Input the base URL of the service you are going to upload. - Namespace of the build Input the publisher namespace. - Absolute path to SDK config This line requires an absolute path to your SDK config. Make sure you already have a compatible file and a clear path to the desired file.
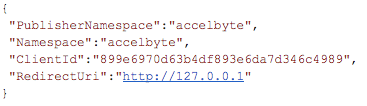
Here is the preview of the Unity SDK:
- Absolute directory of the build output Input the absolute path directory where your game resides. - Relative path to main executable Input the relative path to your game. The file could be an .exe, .msi, .sh or another type of file. Relative path means that a full path is not required, but only the main path of the folder where the game resides. When you input the path, the Player client application can directly run the game. For example: other/otherexe.exe.
7. The other lines that require information beside the directories are as follows: - AppId (unique title) of the game - Version of the game The version must be the same as the game version in Admin Portal. - Version of BuildInfo endpoint (1 or 2) [2] Input the Buildinfo version you're using, either version 1 or 2. The default value is version 2. - Platform ID for the game [win32 win64 windows linux darwin] Input the platform ID for the platform the game will be uploaded to. - Preferred chunk size (OPTIONAL) [in bytes] The chunk size means the game binary wil be uploaded in chunks. The default value is in bites. You can leave this field blank. - ignoreconfig file absolute path (OPTIONAL) Input the path for any config that you want to be ignored. - Log level (OPTIONAL)
The uploading steps in terminal or command line will look like this:
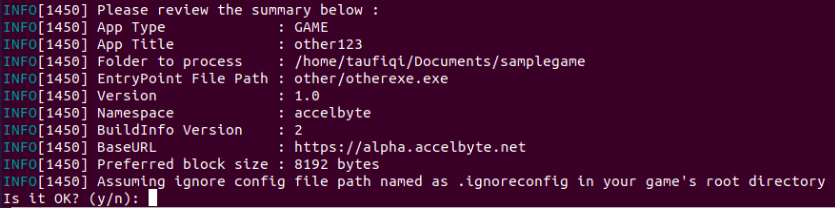
When you finish inputting the data, there will be a summary where you can see the values you have input.
Input “y” to proceed or “n” to cancel the process. In this example, we input “y” and the game begins uploading.
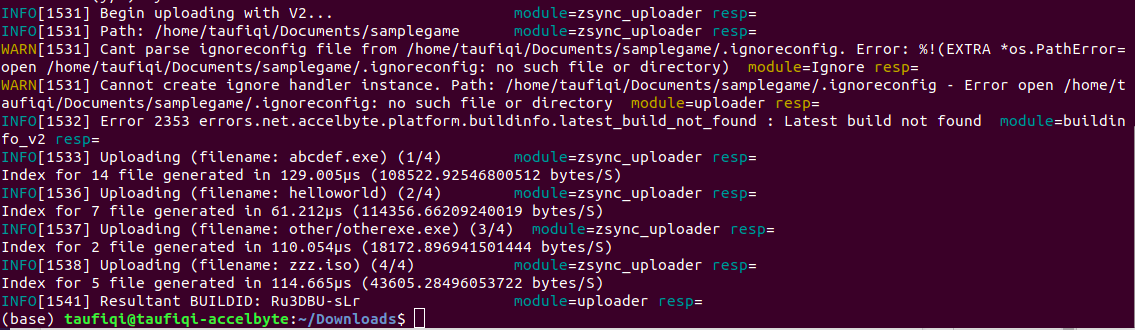
Game Upload Process
Your game will be successfully uploaded when you see the “Resultant BUILDID…”. Your uploaded game will be available in the Admin Portal in the Apps menu.
Option 2: Upload a Game Using Build Util
First, download the latest BuildUtil.exe and save the file in your directory.
Then, open your terminal or command line to run BuildUtil.
Input the required data: - IAM URL - Uploader’s Client ID - Uploader’s Client Secret - Log level (OPTIONAL)
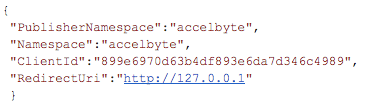
Set up the Game SDK configuration, as seen in the example below.
5. Then, run the Upload command. Please use the note below for more information:
--url (-u): Base URL for the service. For example: ./build-util-v3.3.1-linux_amd64
--namespace (-n): The publisher namespace.
--appID (-a): The App ID of the game being uploaded. Each game should have a unique App ID.
--dir (-d): Absolute path of the directory containing the file to be uploaded.
--entrypoint (-e): The relative path for the executable game in the build folder. Please note that this is relative against the game directory (--dir).
For example, if the entrypoint is /home/dev/GameA/executable/Game.exe and the specified directory is /home/dev/GameA, then the entrypoint value should be executable/Game.exe.
--version (-v): Version of the game to upload. For example 1.0.0, 1.0-alpha, etc.
--platformId (-p): The target platform where the uploaded game will run. Pick one of these values: [win32, win64, windows, darwin, linux-ia32, linux-amd64, linux-generic]. For example, if you’re targeting Windows 32-bit type win32.
--sdkconfig (-f): Absolute path to the SDK config file.
--ignore (-g): Optional. Absolute path to the ignore file. If you’re going to ignore certain files, create an ignore file with the same pattern as a git ignore file and save it somewhere. You can also place a file named .ignoreconfig inside the directory of the game to be uploaded and just skip this flag. In that case, BuildUtil will automatically read your file and ignore it.
Here is the syntax for the upload command: ./build-util-v3.3.1-linux_amd64 upload -u <base_url> -n <publisher_namespace> -a <game_appid> -v <game_version> -e <entrypoint_file> -f <absolute_path_to_sdk_config> -d <absolute_path_to_game_directory> -p <game_ platformid>
For example: ./build-util-v3.3.1-linux_amd64 upload -u https://alpha.accelbyte.net -n accelbyte -a other123 -v 1.0 -e "otherexe.exe" -f "/home/taufiqi/Downloads/UnitySDKConfig.json" -d "/home/taufiqi/Documents/samplegame" -p win64
How to use the BuildInfo Service System
Most of the BuildInfo Service system can be used by calling or consuming the endpoint that is provided by providing a specified parameter, like the uploaded build. BuildInfo Service currently provides two versions that differ in how BuildInfo keeps the build file in the S3 bucket. In the first version, BuildInfo stores the binary file in chunks of 1 MB each. In the second version, BuildInfo stores the binary file as a single file with its control file.
Service flow in BuildInfo starts from:
Start Build Upload In this endpoint, the user must specify the namespace, appID, version, and platformID to start a new build upload. This API will return a unique buildID that will be stored in the database to be used for computing deltas. This buildID will also be used to set the current buildID.
Start File Upload This API will be used to upload file for a given namespace, buildId, filePath, and checksum. The return value for this API are UUID to identify the file and a pre-signed S3 URL to save the binary file.
Commit File Upload This API will be used to commit a new file upload for a given buildID, and call the file that has been uploaded to S3. Checksum comparisons are made to see if the file has changed.
Commit Build Upload This API will be called if a build uploading process has been completed and ready to be committed.
Update per October 2020: We've introduced more features by October including the game subscription plan, which now lets you set and manage BuildInfo Service for your subscribed players to download and update a game when they don't "own" the base game.
Contact us at support@accelbyte.io if you'd like to know more about how this service can be used with your game.