Play
Dynamically assemble and match players
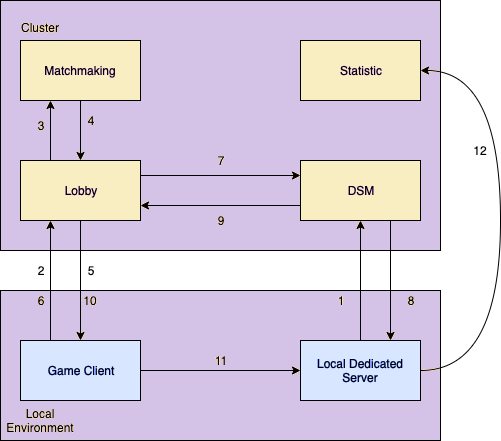
In the latest update of our game matchmaking service, we implement the Dedicated Server Manager functionality. In this guide, we will walk you through how to test the Matchmaking with Dedicated Server set locally. The concept details can be seen from the image and its explanations below:
Before you read the guides below, please note that the project in https://dev. project.accelbyte.io is just an example domain name for a project we're working on.
To implement matchmaking, you need to define the stat attributes to be consumed by the matchmaking service to match players. These attributes are tied to the player and is used by the Matchmaking Service every time a player requests for a match. Please follow the guides below to configure the statistic attributes.
{
  "defaultValue": 0,
  "description": "point used for matchmaking",
  "incrementOnly": true,
  "maximum": 99999,
  "minimum": 0,
  "name": "matchmaking point",
  "setAsGlobal": true,
  "setBy": "SERVER",
  "statCode": "match-point",
  "tags": [
    "match"
  ]
}
Parameters description:
After configuring the stat attributes, you need to tie the stats to the user by using create user’s stat function. This call can be set using server SDK and is triggered when the user successfully connects to the dedicated server. Creating the player stats will also assign the default value of user's stat configuration.
#include "GameServerApi/AccelByteServerStatisticApi.h"
FAccelByteModelsBulkStatItemCreate TestStat;
TestStat.StatCode = "NUMBER_OF_KILLED";
FString UserID = "Game Client UserID";
FRegistry::ServerStatistic.BulkCreateUserStatItems(UserID, { TestStat },
        THandler<TArray<FAccelByteModelsBulkStatItemOperationResult>>::CreateLambda([](const FAccelByteModelsBulkStatItemOperationResult& Result) {
                // Bulk Create user Multiple Stat code Success
            }),
        FErrorHandler::CreateLambda([](int32 Code, FString Message)
            {
                // Bulk Create user Multiple Stat code failed
            }));
These matchmaking configurations are intended to match players without party.
To do so, we call the matchmaking configuration with a channel. You can configure the matchmaking channel using our matchmaking swagger directly: https://dev.project.accelbyte.io/matchmaking/apidocs/
This is a channel configuration for a 1 vs 1 match - 2 players are matched together in this configuration.
{
    "description": "1v1 duel match",
    "game_mode": "duel",
    "rule_set": {
        "alliance": {
            "min_number": 2,
            "max_number": 2,
            "player_min_number": 1,
            "player_max_number": 1
        },
        "flexing_rule": [{
            "attribute": "match-point",
            "criteria": "distance",
            "reference": 100,
            "duration": 120
        }],
        "matching_rule": [{
            "attribute": "match-point",
            "criteria": "distance",
            "reference": 50
        }]
    }
}
This is a channel configuration for a 3 vs 3 vs 3 match. 9 individual players are matched together in this configuration.
{
    "description": "3v3v3 battle royale",
    "game_mode": "battle royale",
    "rule_set": {
        "alliance": {
            "min_number": 2,
            "max_number": 3,
            "player_min_number": 3,
            "player_max_number": 3
        },
        "flexing_rule": [{
            "attribute": "match-point",
            "criteria": "distance",
            "reference": 100,
            "duration": 120
        }],
        "matching_rule": [{
            "attribute": "match-point",
            "criteria": "distance",
            "reference": 50
        }]
    }
}
Parameters description:
// Please put reachable IP address from game client.
FString IPAddress = "127.0.0.1";
int32 PortNumber = 7777;
FString ServerName = "your-awesome-game-server";
AccelByte::FRegistry::ServerDSM.RegisterLocalServerToDSM(
   IPAddress,
   PortNumber,
   ServerName,
   THandler<FAccelByteModelsDSMMessage>::CreateLambda([](const FAccelByteModelsDSMMessage& Result){
    // Register Local Server to DSM Success
    // This should be called when matchmaking found player to play

    UE_LOG(LogTemp, Log, TEXT("Game Mode: %s. Namespace: %s. Pod Name: %s. Session ID: %s"),
        *Result.Message.Game_mode,
        *Result.Message.Namespace,
        *Result.Message.Pod_name,
        *Result.Message.Session_id);
}),
        FErrorHandler::CreateLambda([OnError](int32 Code, FString Message)
    {
        // Register Local Server to DSM Failed!
    }));
3. When registering, the DS is connected to the DSM using WebSockets. We wait for a message containing the info about the match and the players about to connect. It is shown as the Lambda function above.
4. After the match is done, DS uses this server SDK call to update the player’s attributes in the statistic service:
#include "GameServerApi/AccelByteServerStatisticApi.h"

// for example we are going to update 1 user
FAccelByteModelsBulkStatItemInc MVP;
MVP.inc = 1;
MVP.statCode = StatisticStatCode;

FRegistry::ServerStatistic.BulkAddUserStatItemValue({ MVP }, THandler<TArray<FAccelByteModelsBulkStatItemOperationResult>>::CreateLambda([](TArray<FAccelByteModelsBulkStatItemOperationResult> Result){
        // Bulk Add user STATITEMS SUCCESS!
    }), FErrorHandler::CreateLambda([](int32 Code, FString Message)
    {
        // Bulk Add user STATITEMS Failed
    })
);
5. To make sure that the DS is not registered in the DSM anymore, call this server SDK function to deregister the DS from DSM:
FString ServerName = "your-awesome-game-server";

AccelByte::FRegistry::ServerDSM.DeregisterLocalServerFromDSM(
   ServerName,
   FVoidHandler::CreateLambda([](){
      // Deregister success
   }),
   FErrorHandler::CreateLambda([OnError](int32 Code, FString Message)
   {
    // Deregister failed
   })
);
// Make sure you use same server name from Local Dedicated Server Above
FString GameMode = TEXT("1v1");
FString ServerName = TEXT("your-awesome-game-server");
AccelByte::FRegistry::Lobby.SendStartMatchmaking(GameMode, ServerName );
3. Wait for the Lobby to send a notification that a match is found.
AccelByte::FRegistry::Lobby.SetMatchmakingNotifDelegate(AccelByte::Api::Lobby::FMatchmakingNotif::CreateLambda([&](const FAccelByteModelsMatchmakingNotice & Response)
    {
        if (Response.Status == EAccelByteMatchmakingStatus::Done)
        {
            // Match found
            FString MatchId = Response.MatchId;

            // send ready consent
AccelByte::FRegistry::Lobby.SendReadyConsentRequest(MatchId);
        }
        // show loading for non leader party member
        else if (Response.Status == EAccelByteMatchmakingStatus::Start)
        {
            // matchmaking has started
        }
        else
        {
            if (Response.Status == EAccelByteMatchmakingStatus::Cancel)
            {
                //Matchmaking canceled by party leader
            }
            else if (Response.Status == EAccelByteMatchmakingStatus::Timeout)
            {
                //Matchmaking failed: Timeout
            }
            else if (Response.Status == EAccelByteMatchmakingStatus::Unavailable)
            {
                // dedicated server unavailable
            }
            else
            {
                // matchmaking failed
            }
        }
    }));
4. Send the ready consent to notify that the player is ready to join the match using this SDK call:
AccelByte::FRegistry::Lobby.SendReadyConsentRequest(MatchId);
5. Wait for the DS details from Lobby
AccelByte::FRegistry::Lobby.SetDsNotifDelegate(AccelByte::Api::Lobby::FDsNotif::CreateLambda([&](const FAccelByteModelsDsNotice& Notice)
    {
        UE_LOG(LogOnlineGame, Log, TEXT("DS Notif Status: %s"), *Notice.Status);

        if (Notice.Status.Compare(TEXT("READY")) == 0)
        {
            FString ServerAddress = FString::Printf(TEXT("%s:%i"), *Notice.Ip, Notice.Port);

           // Use this IP address and port to connect to your server.
        }
    }));
6. Connect to the DS using the details.
To make sure that the local DS is already deregistered from the DSM, use the DSM swagger at https://dev.project.accelbyte.io/dsm/apidocs/
Bearer <access_token>
2. Call this endpoint to see if the local DS is still registered
GET /dsm/admin/namespaces/{namespace}/servers/local
3. Call this endpoint to remove the local DS manually
DELETE /dsm/admin/namespaces/{namespace}/servers/local/{name}
If you have any question regarding this product update and guides, please contact support@accelbyte.io. Visit our blog pages for more updates and guides/tutorials.
Reach out to the AccelByte team to learn more.